DRV8871 Bi-directional DC Motor Driver with PWM Input
The DRV8871 is a low-cost MOSFET-based H bridge DC motor driver which is capable of driving a DC motor in a Bi-direction. This motor driver IC can deliver up to a 3.6A peak current. The DRV8871 Offers short circuit, under voltage, overcurrent, and over temperature protections. It has two inputs to control the direction of the motor also we can use these inputs to change the rotation speed by providing PWM signals. One notable feature is its advanced current-regulation circuitry, which doesn't rely on an analog voltage reference or external sense resistor. Instead, it uses a standard low-cost, low-power resistor to set the current threshold. This approach can reduce system power requirements and bulk capacitance needed for stable voltage, especially during motor startup and stall conditions. The IC is available in an 8-pin HSOP package.
DRV8871 Pinout Configuration
Here are the pinout details for DRV8871.
| PIN | NAME | DESCRIPTION |
| 1 | GND | Logic ground |
| 2 | IN2 | Logic input |
| 3 | IN1 | Logic inputs |
| 4 | ILIM | Current limit control |
| 5 | VM | 6.5-V to 45-V power supply |
| 6 | OUT1 | H-bridge output |
| 7 | PGND | High-current ground path |
| 8 | OUT2 | H-bridge output |
Features of DRV8871
DRV8871 bi-directional DC motor Driver has the following key features:
- Wide (6.5-V to 45-V) Operating Voltage
- 565-mΩ Typical RDS(on) (HS + LS)
- 3.6-A Peak Current Drive
- PWM Control Interface
- Current Regulation Without a Sense Resistor
- Low-Power Sleep Mode
- Small Package and Footprint
- 8-Pin HSOP With PowerPAD
- 4.9 × 6 mm
Manufacturers of DRV8871:
The DRV8871 is manufactured by Texas Instruments. There are no alternative manufacturers for the same part number as of the date of writing this article.
DRV8871 Equivalents
If you are looking for an equivalent or replacement for DRV8871, you can use DRV8870 and DRV8872.
DRV8871 Alternatives
If you are looking for an alternative for DRV8871 you can look at the other ICs from these.
L293D, L298, TB6612FNG, DRV8833, MAX1508, TA6586, DRV8837, MAX1919, L9110.
Note: Complete technical details can be found in the DRV8871 datasheet at this page’s end.
DRV8871 Schematics
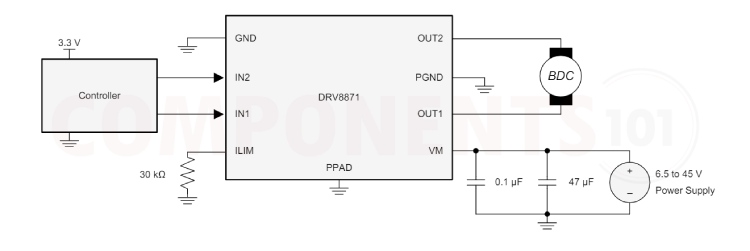
The following image shows the typical circuit diagram for DRV8871.

The above circuit diagram shows how to connect and drive a motor using DRV8871. In this circuit, the motor is connected to pin OUT1 and pin OUT2. The ground and PGND pin is connected to to ground of the circuit. VM is connected to a power supply. Here we added the 47uf capacitor and the 0.1uf capacitor to stabilize the circuit voltage. To control the direction of the motor in the circuit we have connected the input pins to the output pins of a microcontroller. We can use any microcontroller here. You can control the motor according to this truth table. We can control the motor speed by connecting the inputs to a PWM signal. The circuit current can be set by connecting a suitable resistor to the ILIM Pin.
| IN1 | IN2 | OUT1 | OUT2 | DESCRIPTION |
| 0 | 0 | High-Z | High-Z | Coast; H-bridge disabled to High-Z (sleep entered after 1 ms) |
| 0 | 1 | L | H | Reverse (Current OUT2 → OUT1) |
| 1 | 0 | H | L | Forward (Current OUT1 → OUT2) |
| 1 | 1 | L | L | Brake; low-side slow decay |
Having Trouble with DRV8871?
My circuit is resetting when I turn on the circuit.
It might be due to the voltage spike/load drawing more current than the rated range; we can solve this by adding a capacitor(47uf) parallel to supply voltage and also try to add a capacitor parallel with the motor.
Why is my circuit not working?
1. Check all connections, and make sure everything is connected properly.
2. Check the motor voltage and current. Make sure that the rating is in the range of IC rating
3. Should connect the ground of the motor power supply and the logic circuit is commonly connected.
The IC gets very hot and automatically turns off:
- Overloading: The motor driver IC may be driving a motor that draws more current than the IC can handle. Check the datasheet for the maximum current rating of the motor
- Voltage Spikes: If there are voltage spikes or transients in the motor circuit, it could cause the IC to overheat. Adding capacitors to suppress these spikes can help protect the IC.
- Poor Heat Dissipation: The IC may not be dissipating heat efficiently. Make sure the IC is operating below 100 degrees Celsius
- The motor is jerking: make sure the voltage and current rating of the motor match with the IC maximum parameters. Add .1uf capacitor parallel to the motor pins to reduce the noise.
How to do DRV8871 Arduino Interfacing?
For controlling the TA6586 you will need two GPIO pins. Connect the inputs of TA6586 to these pins, set them as output and by changing the state of these pins you can control the TA6586 and the motor connected to it. You can refer to the truth table given above.
How to minimize the jerking of motors?
Add .1uf capacitor parallel with motor connections to minimize jerking.
Is a heat sink necessary for the working of DRV8871?
No. For most applications, the DRV8871 can operate without a heat sink within its specified operating conditions.
Design Choices to be Considered with DRV8871
Power Supply Recommendations
Bulk Capacitance
Having appropriate local bulk capacitance is an important factor in motor drive system design. In general, having more bulk capacitance is beneficial, while the disadvantages are increased cost and physical size.
The amount of local capacitance needed depends on a variety of factors, including:
- The highest current required by the motor system
- The power supply’s capacitance and ability to source current
- The amount of parasitic inductance between the power supply and motor system
- The acceptable voltage ripple
- The type of motor used (brushed DC, brushless DC, stepper)
- The motor braking method
The inductance between the power supply and the motor drive system will limit the rate of current that can change from the power supply. If the local bulk capacitance is too small, the system responds to excessive current demands or dumps from the motor with a change in voltage. When adequate bulk capacitance is used, the motor voltage remains stable and high current can be quickly supplied.
The data sheet generally provides a recommended value, but system-level testing is required to determine the appropriate sized bulk capacitor. The voltage rating for bulk capacitors should be higher than the operating voltage, to provide margin for cases when the motor transfers energy to the supply.
Layout Guidelines
The bulk capacitor should be placed to minimize the distance of the high-current path through the motor driver device. The connecting metal trace widths should be as wide as possible, and numerous vias should be used when connecting PCB layers. These practices minimize inductance and allow the bulk capacitor to deliver high current. Small-value capacitors should be ceramic and placed close to the device pins. The high-current device outputs should use wide metal traces. The device thermal pad should be soldered to the PCB top-layer ground plane. Multiple vias should be used to connect to a large bottom-layer ground plane. The use of large metal planes and multiple vias help dissipate the I2 × RDS(on) heat that is generated in the device.
Layout Example

Thermal Considerations
If the die temperature exceeds approximately 175°C, the device is disabled until the temperature drops below the temperature hysteresis level.
Any tendency of the device to enter TSD is an indication of either excessive power dissipation, insufficient heatsinking, or too high of an ambient temperature.
Power Dissipation
Power dissipation in the DRV8871 device is dominated by the power dissipated in the output FET resistance, RDS(on). Note that at startup, the current is much higher than the normal running current; this peak current and its duration must also be considered.
Heat sink
The Power PAD package uses an exposed pad to remove heat from the device. For proper operation, this pad must be thermally connected to copper on the PCB to dissipate heat. On a multi-layer PCB with a ground plane, this connection can be accomplished by adding a number of vias to connect the thermal pad to the ground plane.
On PCBs without internal planes, a copper area can be added on either side of the PCB to dissipate heat. If the copper area is on the opposite side of the PCB from the device, thermal vias are used to transfer the heat between the top and bottom layers.
Applications of DRV8871
- Robotics
- printers
- Motorized Vehicles
- Home Automation
- Industrial Automation
- Camera Gimbal Control
- Solar Tracking System
- DIY Projects
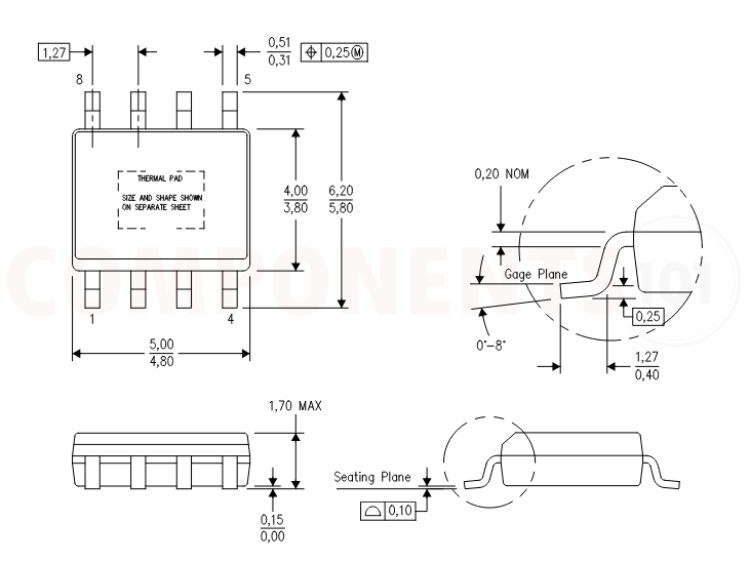
DRV8871 Footprint Information and Dimensions
Here you can find the mechanical drawings of DRV8871 along with its dimensions. The dimensions can be used to create custom footprints of the module and be used for PCB or CAD modelling.


