TEENSY 3.2 Development Board

The Teensy 3.2 is a development board that has a 32-bit ARM Cortex M4 microcontroller that runs at 72MHz that can be programmed using the Arduino software.
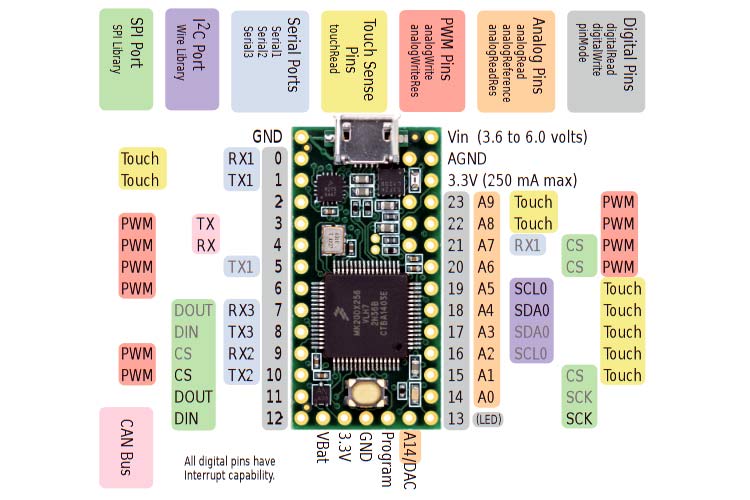
Teensy 3.2 Pinout Configuration
|
Pin Category |
Pin Name |
Details |
|
Power |
VIN, 3.3V, Analog GND, GND |
VIN – Supply voltage pin when using an external power source (3.6V to 6.0V) 3.3V – Regulated output voltage from the on-board regulator (250mA max.) Analog GND – Acts as GND for the ADC and DAC, can be connected to GND GND – Ground pins |
|
Analog Pins |
A0 – A9, A14 |
Pins A0 – A9 and A14 can act as analog inputs with 13-bit resolution |
|
Input/output pins |
D0 – D23 |
24 I/O pins breadboard friendly |
|
Serial |
TX1, RX1 TX2, RX2 TX3, RX3 |
3 serial ports |
|
External interrupts |
D0 – D23 |
All digital pins have interrupt capability |
|
PWM |
D3 – D6 D9 –D10 |
22 PWM pins total |
|
SPI |
DIN, DOUT, SCK, CS |
SPI port |
|
Inbuilt LED |
D13 |
LED to act as a general-purpose GPIO indicator |
|
I2C |
SCL0, SDA0 |
Inter-Integrated Circuit communication port |
|
CAN |
TX, RX |
CAN bus ports |
|
Touch sensing |
D0 – D1 D15 – D19 D22 – D23 |
Can be used for capacitive touch sensing |
Teensy 3.2 Technical Specifications
|
Microcontroller |
MK20DX256 |
|
Operating voltage |
3.3V |
|
Recommended input voltage for VIN pin |
3.6V to 6.0V |
|
Analog inputs |
21 |
|
Digital I/O pins |
34 |
|
DC source/sink from I/O pins |
10mA |
|
Flash memory |
256KB |
|
SRAM |
64KB |
|
EEPROM |
2KB |
|
Frequency (clock speed) |
72MHz |
|
Communication |
I2C, SPI, UART, CAN, USB |
Note: Complete technical information can be found in the Teensy 3.2 Datasheet, linked at the bottom of this page.
Other Teensy Boards: Teensy LC, Teensy 3.6, Teensy 3.5
Other Development Boards: Arduino, STM32, ESP12, ESP31, Raspberry Pi, ESP8266
Teensy 3.2 vs Arduino Uno
|
Name |
Arduino Uno |
Teensy 3.2 |
|
Processor |
ATMega328P |
MK20DX256 |
|
Operating/input voltage |
5V |
3.3V |
|
CPU speed |
16MHz |
72MHz |
|
Analog pins |
8 |
21 |
|
Digital IO/PWM |
14 |
34 |
|
EEPROM/SRAM(KB) |
1/2 |
2/64 |
|
Flash |
32K |
256K |
|
USB Connector |
Mini |
Micro |
|
UART |
1 |
3 |
|
SPI |
1 |
1 |
|
I2C |
1 |
1 |
Understanding Teensy 3.2 Development Board
The Teensy 3.2 is a 32-bit Arduino compatible development board that aims to bring ARM Cortex processing power into a breadboard friendly package for hobbyist use. The 3.2 is the smallest board in the Teensy family of microcontrollers but it does not lack in performance, outperforming the similarly sized Arduino Nano in most aspects.
Powering your Teensy 3.2:
There are three ways of powering your Teensy 3.2 development board:
- Using the built-in USB micro connector.
- Supplying a voltage of 3.6V to 6V from an external supply, possibly a 5V regulator. This method is recommended.
- Supplying 3.3V directly to the 3.3V pin. This method is not recommended since the supply line is directly connected to the microcontroller; any spikes or ripple might lead to damage.
Input/Output:
The Teensy 3.2 has 34 GPIO pins with a current sink/source ability of 10mA. Pull-up resistors can be enabled on the pins.
Most pins have extra functionality as well:
- Serial ports – receive and transmit data via the UART protocol
- I2C ports – two-wire communication via the IIC protocol using the Wire library
- SPI – fast serial communication using the SPI library
- PWM – output an 8-bit pulse width modulated square wave that is controlled using two functions:
- analogWrite() – write the duty cycle of the PWM waveform to the respective pin
- analogWriteResolution() – change the PWM resolution from 2 bits to 16 bits
- Analog pins that can be controlled using three functions:
- analogRead() – returns an integer value corresponding to the analog input
- analogReference() – selects a reference voltage source for the ADC
- analog read resolution() – configure the resolution of the ADC conversion
- Touch sensing pins – sense touch using capacitive touch sensing, controlled using the touchRead() function
- Pin 13 has a built-in LED
These special functions and their respective pins are illustrated in the Teensy 3.2 pin diagram shown above.
How to Use the Teensy 3.2 Board
The Teensy 3.2 can be programmed using any C editor or the Arduino software, though the latter is quicker and easier for beginners.
The Arduino software download link can be found here:
Once the software is downloaded and ready, the Teensy 3.2 is connected to the computer through the USB micro port.
Uploading Your First Program:
Select the correct board name (Teensy 3.2) in the Tools > Boards menu and select the correct COM port under Tools > Ports.
Since the built-in LED is on pin 13, just like the Arduino, the basic blink sketch will work on the Teensy 3.2. The code is shown below.
Applications
- Rapid prototyping
- Small size ARM development board
- Robotics


How to disable pm?