Pickit 3 Programmer/Debugger
The PicKit3 is an official Programmer cum Debugger from Microchip Technologies for PIC Microcontrollers.
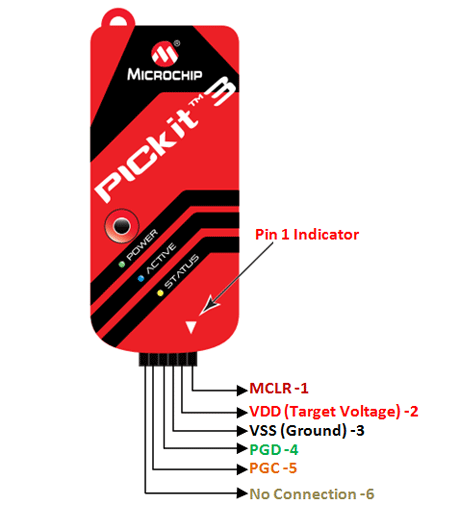
PicKit 3 Pinout
|
Pin Number |
Pin Name |
Description |
|
1 |
MCLR/Vpp |
Connected to Master clear external reset pin of PIC to reset the MCU before programming |
|
2 |
VDD (Target) |
Target voltage of PIC, 5V or 3.3V |
|
3 |
Ground |
Ground pin of the system |
|
4 |
PGD/ICSPDAT |
Program Data(PDG) is connected to the In Circuit Serial Programming (ICSP) data pin |
|
5 |
PGC/ICSPCLK |
Program Clock (PGC) is connected to In Circuit Serial Programming (ICSP) clock pin |
|
6 |
No connection |
This pin is reserved for future use |
Pickit 3 Features
- Used to program and debug PIC microcontrollers
- Easy to interface with PC via USB cable
- Supports windows standard drivers
- Has programmer to go feature where you can program without PC
- Built-in Over Voltage and Short circuit Monitor
- On-board diagnostic LED’s
- Supports all latest version of PIC and IDE’s
Other PIC Programming Tools
PicKit 2, ICD 2, ICD 3.
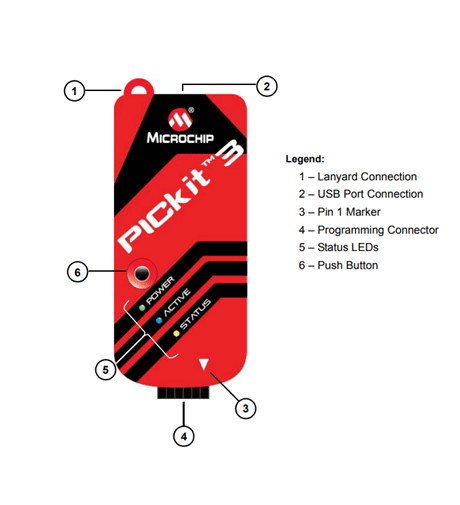
PicKit3 Overview
The PicKit3 can be used with MPLAX IDE running on Windows Platform to program or debug PIC Microcontrollers that support ICSP – In Circuit Serial Programming. Meaning the PIC can be programmed with only 2-wires (2-pins) PGD and PGC excluding the power pins.
When you purchase a PicKit 3 you will also get an USB cable, CD and header pins along with it. The USB cable is used to interface the PicKit 3 with PC and CD consists of the driver for your windows to recognize the PicKit 3. Apart from that the PicKit 3 itself has some on-board diagnostic LEDs and push button.
|
LED/Button |
Description |
|
Power LED |
This LED lights up in green colour when the PicKit3 receives power |
|
Active LED |
This LED lights up in blue colour when the Picit 3 can establish a communication link to our PC |
|
Status LED |
This LED lights up in Yellow colour when the Pickit 3 is busy programming our PIC It also lights up in Red colour if an Error occurs in the programming process |
|
Push Button |
This push button is used “Programmer-to-go” where you can program your PIC without a PC |
Difference between Pickit 2 and PicKit 3
The Pickit 2 is the predecessor of PicKit 3. Both do almost the same job, but Pickit 3 has some additional options and supports for latest versions of PIC. Also debugging will be a bit faster than Pickit 2. If you are a beginner, then even Pickit 2 would work fine. If you are looking for more advanced options like Logic analyzer built-in then have a look at ICD3.
How to connect PicKit 3 with PIC microcontroller
The PicKit2 or PicKit3 can be used to PIC microcontrollers if the PIC supports ICSP programming. If they support ICSP programming look into their pinouts to find the Vpp, Vdd, Vss, ICSPDAT and ICSPCLK pins. The pin number of this pin will vary based on the IC package. The below image should give you a rough idea.
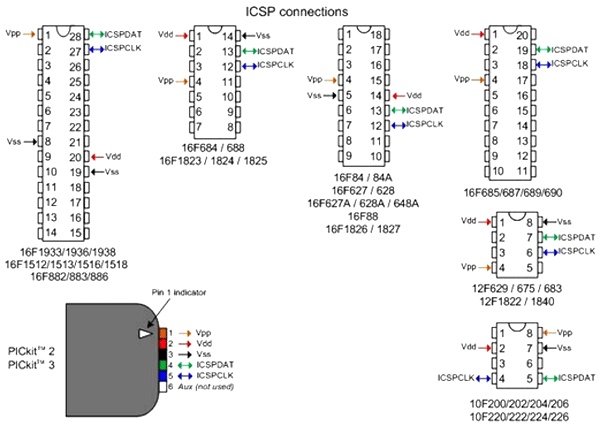
Once you find the pins simply connect them to Pickit respectively and program or debug you device. Remember that both the PIC as well as the PicKit should be powered during programming or debugging. Also be careful with the voltage you set in software, for example using 5V to program a 3.3V PIC might damage the IC or the PicKit permanently. This blinking tutorial should help you to understand how to use PicKit 3 to program a PIC microcontroller using the MPLAB IPE Environment.
Applications
- Program PIC Microcontrollers
- Debug PIC Microcontrollers
- Code dumping in production process
- Flashing or Firmware update.


