MSP432 Launchpad
The MSP432 is an Ultra-low power high performance 32-bit ARM cortex M4 development board from Texas instruments. This is the successor of another low power development board called MSP430.
Features
- This LaunchPad has 32-bit ARM Cortex M4 Microcontroller
- Operating voltage: 1.65V to 3.7V
- Source or sink current of GPIO: 2mA
- 84 GPIOs
- 4 SPI, UART, I2C and IrDA pins
- Operating Speed: 48MHz (maximum)
- Ultra-low power, 95uA per MHz (850nA during standby)
- 24-channel, 14-bit ADC (1 mega sample per second)
- 8-chanel DMA
- Supports 16-32 bit and DSP Instruction Set
- Flash memory: 256KB, SRAM 64KB
- Supports Real Time Operating System (RTOS)
- Has Energy Trace option
- Bluetooth Low Energy (BLE) and Wi-Fi can be added easily
- Can be programmed using Energia, IAR workbench, Keil and CCS
Note: Complete technical details can be found in the MSP432 Datasheet linked at the bottom of this page.
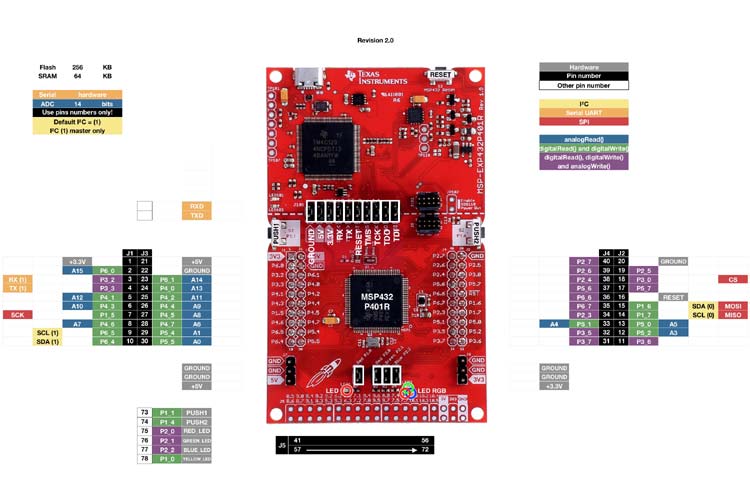
MSP432 Pinout Configuration
|
Pin Number |
Function 1 |
Function 2 |
Special Function |
|
1 |
+3.3V |
- |
- |
|
2 |
Digital Read/Write (6.0) |
Analog Read (15) |
- |
|
3 |
Digital Read/Write (3.2) |
PWM (3.2) |
RX – UART |
|
4 |
Digital Read/Write (3.3) |
PWM (3.3) |
TX – UART |
|
5 |
Digital Read/Write (4.1) |
Analog Read (12) |
|
|
6 |
Digital Read/Write (4.3) |
Analog Read (10) |
|
|
7 |
Digital Read/Write (1.5) |
- |
SCK – SPI |
|
8 |
Digital Read/Write (4.6) |
Analog Read (7) |
|
|
9 |
Digital Read/Write (6.5) |
PWM (6.5) |
SCL – I2C |
|
10 |
Digital Read/Write (6.4) |
PWM (6.4) |
SDA – I2C |
|
11 |
Digital Read/Write (3.6) |
PWM (3.6) |
|
|
12 |
Digital Read/Write (5.2) |
Analog Read (3) |
|
|
13 |
Digital Read/Write (5.0) |
Analog Read (5) |
- |
|
14 |
Digital Read/Write (1.7) |
- |
MISO - SPI |
|
15 |
Digital Read/Write (1.6) |
- |
MOSI – SPI |
|
16 |
RESET |
- |
- |
|
17 |
Digital Read/Write (5.7) |
- |
- |
|
18 |
Digital Read/Write (3.0) |
PWM (3.0) |
CS – SPI |
|
19 |
Digital Read/Write (2.5) |
PWM (2.5) |
- |
|
20 |
Ground |
- |
- |
|
21 |
+5V |
- |
- |
|
22 |
Ground |
- |
- |
|
23 |
Digital Read/Write (6.1) |
Analog Read (14) |
- |
|
24 |
Digital Read/Write (4.0) |
Analog Read (13) |
- |
|
25 |
Digital Read/Write (4.2) |
Analog Read (11) |
- |
|
26 |
Digital Read/Write (4.4) |
Analog Read (9) |
- |
|
27 |
Digital Read/Write (4.5) |
Analog Read (8) |
- |
|
28 |
Digital Read/Write (4.7) |
Analog Read (6) |
- |
|
29 |
Digital Read/Write (5.4) |
Analog Read (1) |
|
|
30 |
Digital Read/Write (5.5) |
Analog Read (0) |
- |
|
31 |
Digital Read/Write (3.7) |
PWM (3.7) |
- |
|
32 |
Digital Read/Write (3.5) |
PWM (3.5) |
- |
|
33 |
Digital Read/Write (5.1) |
Analog Read (4) |
- |
|
34 |
Digital Read/Write (2.3) |
PWM (2.3) |
- |
|
35 |
Digital Read/Write (6.7) |
PWM (6.7) |
- |
|
36 |
Digital Read/Write (6.6) |
PWM (6.6) |
- |
|
37 |
Digital Read/Write (5.6) |
PWM (5.6) |
- |
|
38 |
Digital Read/Write (2.4) |
PWM (2.4) |
- |
|
39 |
Digital Read/Write (2.6) |
PWM (2.6) |
- |
|
40 |
Digital Read/Write (2.7) |
PWM (2.7) |
- |
Where to Use MSP432 Launchpad
This development board supports RTOS and ARM architecture, hence we can use this for high performance applications. At the same time, the board is engineered to consume low power, making it perfect for battery operated applications. The board also has a Power trace option which will help us to monitor and improve the power consumption of the board. It has an on-board emulator and supports Energia IDE, hence it is easy to program and de-bug. So if you are looking for a powerful MCU with ARM architecture and that could run on ultra-low power, then the MSP432 might be the right choice for you.
How to use the MSP432P40 Board
The LaunchPad on purchase comes with the following:
1. Pamphlet with pin-outs and other useful information
2. USB programming cable
3. MSP432 board.
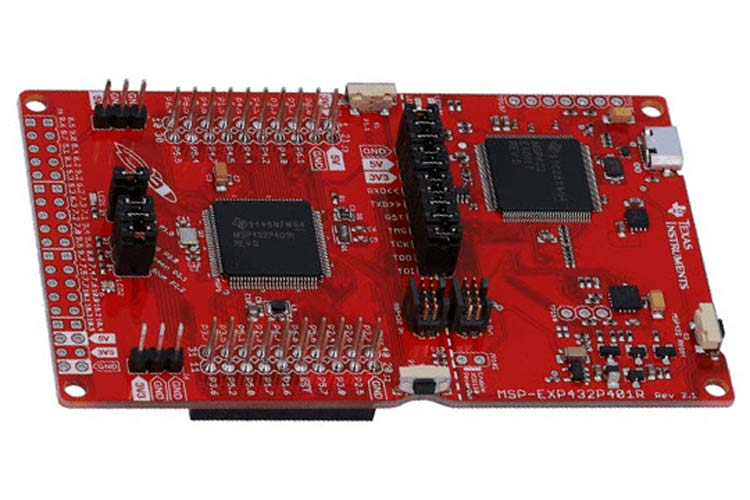
The MSP432 board has two sections; the upper section is the emulator part which can be used to program and debug the board while the lower section consists of the ARM Cortex MCU with a couple of switches and LEDs. These switches and LEDs can be used to practice your program and debug them.
The quickest way to get started with MSP432 is to use the Energia IDE, which is an open-source development platform very similar to Arduino. This method is highly recommended for beginners only, since the IDE itself is still subjected to a lot of improvements. If you want to extract the full juice out of this ARM MCU, then you should use the Code composer studio or the IAR workbench. Texas instruments provides a complete guide on how to get started with CCS and MSP432. You can also look into the cold version of CCS if you wish to go light.
Getting started with Energia
- Download Energia
- MSP432 Energia Documentation
- MSP432 Pin-Maps
- User’s Guide
Getting started with Code Composer Studio
Applications
- Low power high performance applications
- Battery-powered portable electronics
- Supports Wi-Fi and BLE so can be used for IOT
- Home/Industrial Automation
- Security systems
- Power critical embedded applications
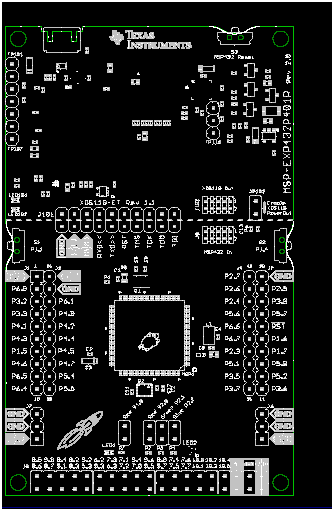
2D Model and Dimensions