W1209 Temperature Control Switch (Thermostat Sensor Module)
W1209 is an intelligent thermostat sensor module, which has an onboard microcontroller chip and does not require any programming to function. The W1209 comes with a high-precision NTC temperature sensor to sense the temperature around. The module has 3 tactile switches which help us customize the module’s parameters according to our needs.
Features and Specifications of W1209 Temperature Control Switch
This section mentions some of the features and specifications of the W1209 Thermostat sensor module.
- Temperature control range: -50 to 110 degree C
- Measurement accuracy: 0.1 Degree C
- Input Voltage: 12V DC
- Refresh rate: 0.5 Seconds
- Measurement inputs: NTC(10K 0.5%)
- Output: 1 Channel Relay Output 240V AC/ 12V DC
- Relay current Capacity: 10A
- Module current consumption; Static state = Less than 35mA, Max = less than 65mA
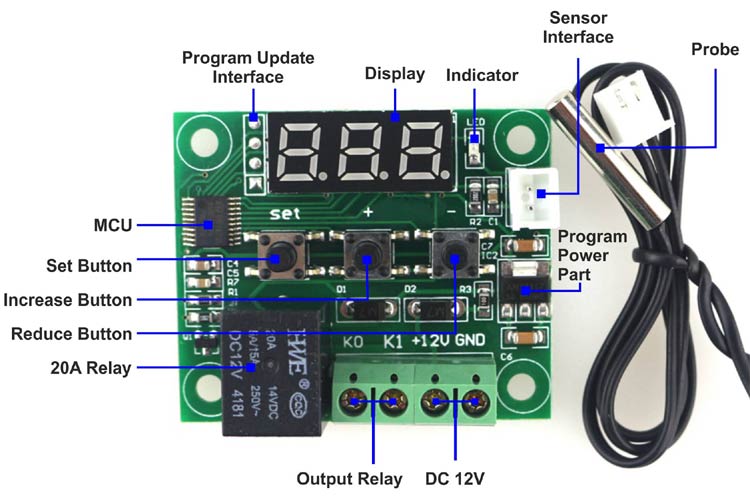
Pin Configuration of W1209 Temperature Control Switch
The W1209 Temperature control switch has few pins, the table below explains the ports and the function of each pin.
|
Pin Type |
Description |
|
Sensor Input Connector(White) |
Temperature sensor connect |
|
Sensor Input Connector(White) |
Temperature sensor connect |
|
K0 |
Relay contact 1 |
|
K1 |
Relay contact 2 |
|
12V |
Input Voltage |
|
GND |
Ground |
Connections to a W1209 Temperature Control Switch
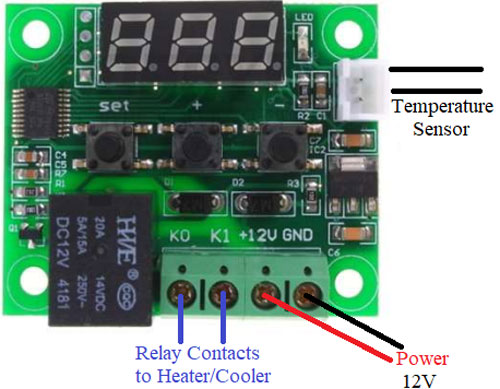
Connecting and using the W1209 thermostat module is pretty easy. The temperature sensor which is provided separately connects to the white connector. The module requires 12V to operate, so the 12V and the ground could be connected to an external power supply unit. The on-board relay can switch loads up to 240V AC at 5A and 12V DC at 10 A.
Displaying and Setting the various parameters of the Thermostat Sensor Module
The module has various switches ‘SET’, ‘+’, ‘-’ which can be used to display and set certain parameters of the thermostat sensor module. Let’s see how we can customize and set the parameter's values.
Displaying the current temperature
The module displays the temperature value, output by the NTC temperature sensor. By default, the display just shows the temperature values. If clicked set or any other button to vary the parameters, the module returns back to displaying the current temperature on the display after 5 seconds of inactivity.
Setting the trigger temperature
Trigger temperature refers to the temperature point when the relay switches ON/OFF. To set the trigger temperature, you have to press the SET button on the module. You can use the ‘+’ and ‘-’ buttons to set the temperature by an increment and decrement of 0.1 Degrees. Once you have set the desired value, do not press any button and the value would be stored after 2 seconds automatically.
Setting the parameters(P0, P1, P2, P3, P4, P5, P6)
The module has seven parameters to set, which makes the module flexible for different applications. Setting a parameter on the module is done using the switches on the module only. To set any parameter, long-press the SET button for around 5 seconds. After 5 seconds, the module displays P0, the ‘+’ and ‘-” buttons can be used to scroll through the different parameters(P0 to P6). Once you decide which parameter to be changed, go to that parameter using ‘+’ and ‘-” buttons and press the set button once. Once you are in the specific parameter, you can change the values using the ‘+’ and ‘-” buttons. After no activity for 5 seconds, the values will be set automatically and the module will return displaying its default temperature.
The table in the next section depicts the range of the parameters and the usual values for the proper functioning of the module.
1. Heating or Cooling Parameter (P0):
The first parameter P0 has two settings, Cooling or Heating. It can be set based upon the application in which it has to be used(i.e. For heaters/coolers). While connecting a cooling system, set the P0 to ‘C’, as the relay will energize when the temperature is reached. Whereas, when using a heating system, set the P0 to ‘H’, as the relay will de-energize when the set temperature is reached.
2. Backlash/Hysteresis Parameter (P1):
This parameter can be used to prevent continual triggers whenever the temperature is around the set temperature. Or to say, the desired change in the temperature before relay actuation. If P1 is set to the default value of 2 Degrees C and the trigger temperature is 30 Degree C, the relay will only de-energize once it reaches around 28 Degrees C and not 30 Degree C.
3. Upper limit of the thermostat module (P2):
This parameter can be used as a safety measure. It sets up an upper limit for the user to set the high-temperature trigger value.
4. Lower limit of the thermostat module (P3):
This parameter can be used as a safety measure. It sets up a lower limit for the user to set the low-temperature trigger value.
5. Temperature Offset Correction Parameter (P4):
You can set an offset value if the temperature sensor is unable to display the exact value as the real temperature. If there is a difference in the displayed data and the actual data, an offset value can be set from a range of -7 to 7.
6. Trigger Delay Parameter (P5):
The P5 parameter can be used to provide a delay in relay actuation when the trigger temperature has been achieved. The delay in this parameter can be set up to 10 minutes.
7. Temperature Alarm Parameter (P6):
The parameter P6 is used as a safety feature. The relay switches off when the value set is reached. The on board display also shows a ‘---’ to indicate an alarming condition. It can be set to ‘OFF’ as default.
Setting the parameters of the W1209 Temperature Control Switch
To set the different parameters of the module, long press the ‘Set’ button on the module and change the values using the ‘+’ and ‘-’ buttons.
|
Settings |
Parameter |
Range |
Default Value |
|
H/C |
P0 |
H/C |
Heat/Cold(Depends on the application) |
|
Hysteresis set |
P1 |
0.1-15 |
2 |
|
Upper limit |
P2 |
110 |
110 |
|
Lower limit |
P3 |
-50 |
-50 |
|
Correction |
P4 |
-7.0 - 7.0 |
0 |
|
Delay Start Time |
P5 |
0-10 mins |
0 |
|
High Temperature Alarm |
P6 |
0-100 |
OFF |
Note: Long pressing the +/- button will reset the values to default.
Alternatives for W1209 Temperature Control Switch
XH-W1219, NTC Thermistor Temperature Sensor Module, AM2305
Applications of W1209 Temperature Control Switch
Here are some of the applications of the W1209 Thermostat sensor module.
- To control fan/heater/cooler wirelessly
- Preset or setpoint temperatures
- Central Heaters/Coolers
- Water Heaters
- Refrigerators
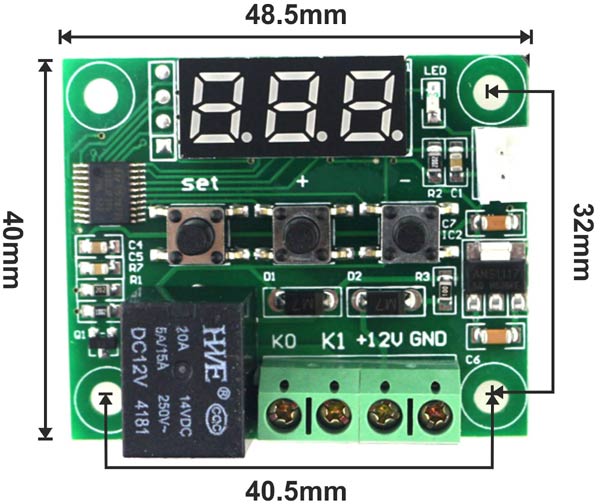
2D Model of W1209 Temperature Control Switch
The image below shows the 2D model of the W1209 thermostat sensor module along with its dimensions in millimeters. The following details can be used to design custom footprints of the module and be used while PCB designing and CAD modelling.